
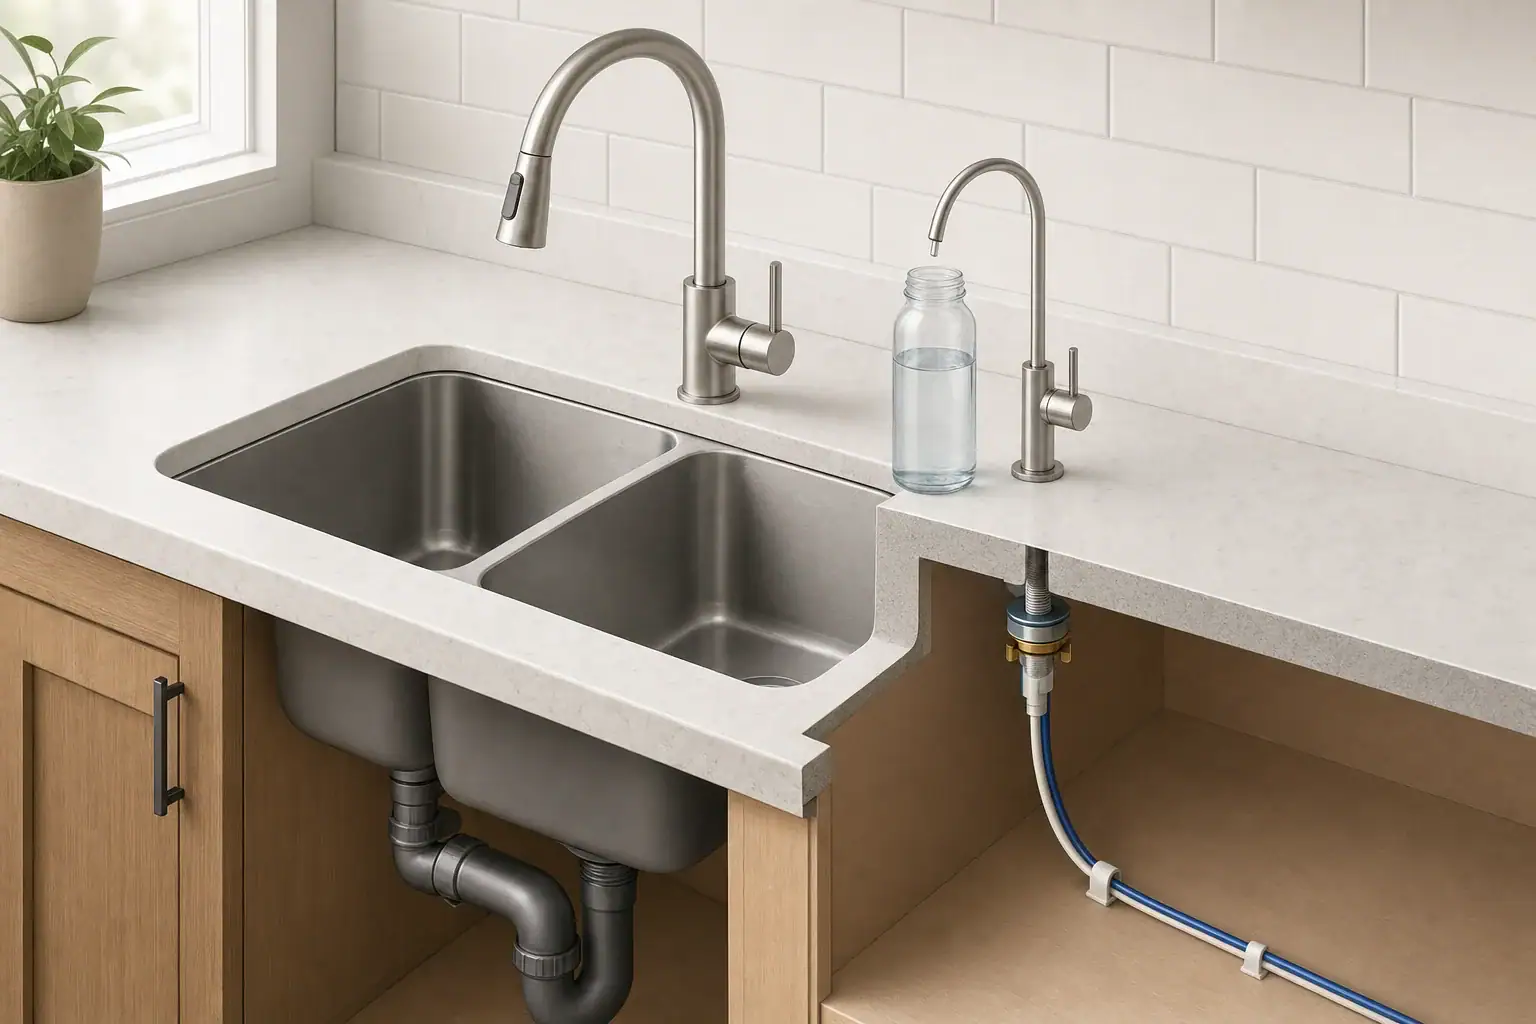
Quick answer: Place an RO faucet where its spout reaches the sink and lets you fill common bottles or pitchers without blocking the main faucet, handles, sprayer, or work area. Before drilling, confirm the exact model’s hole size, base and washer footprint, deck-thickness limit, underside access, and tubing route.
RO faucet placement: check both sides of the deck
A convenient spot above the sink can be unusable below it. Treat every possible location as a complete mounting zone: the faucet needs operating room above the deck, while its washer, mounting nut, tubing, and installation tool need room below it.
There is no universal RO faucet hole diameter, setback, or maximum deck thickness. Use the installation instructions for the exact faucet and RO system you are installing.
1. Read the faucet and system instructions first
Record the specified opening diameter, faucet-base footprint, underside washer size, permitted mounting thickness, and any required flat mounting area. Also identify whether the system uses a standard drinking-water faucet or an air-gap RO faucet, which may require additional tubing below the deck.
For example, the Pentair PRF-RO installation manual specifies a 2-inch-diameter flat area above and below the mounting surface and a maximum mounting thickness of 1¼ inches for that model. Those are model-specific requirements, not standard RO faucet dimensions.
2. List candidate locations
Look at an unused soap-dispenser or sprayer opening, a sink manufacturer’s designated accessory position, an appropriate area on the sink deck, or a countertop position beside the basin. Do not assume that a predrilled or pre-scored opening fits your faucet until you measure it and check the sink instructions.
3. Dry-position the faucet above the deck
Without drilling, hold or set the uninstalled faucet over each candidate point. The base should sit flat. Orient the spout and handle as they would be used, then check the following:
- Main-faucet rotation and handle movement
- Pullout-faucet or side-sprayer movement
- RO faucet handle operation
- Clearance from the backsplash, window ledge, soap dispenser, and dish rack
- Whether the spout discharges into the sink basin
- Whether the tallest bottle or pitcher you regularly fill fits beneath the spout
4. Mark the full footprint, not only the center point
Use removable tape to mark the proposed hole center and the full faucet-base footprint. Then inspect the matching point below the deck for the washer and mounting nut. A hole center can look clear while the faucet base overlaps a raised edge or the underside washer lands on a sink rail.
5. Measure the full deck stack
Measure every layer the mounting hardware must pass through. Depending on the installation, this can include the sink flange, countertop, build-up strips, and subtop. Compare the total with the faucet manual’s stated mounting limit; do not measure only the visible countertop surface.
6. Inspect below the sink
Use a light and mirror if needed. Check for sink bowls, mounting clips, rails, reinforcing ribs or webbing, cabinet framing, disposal components, electrical boxes, supply plumbing, drain parts, and drawer movement. Confirm that the washer can sit flat and that the mounting nut can be reached with the tool specified or suitable for the faucet.
7. Mock up the tubing route
Plan a supported route from the RO system to the faucet that avoids sharp bends, pinching, heat sources, drawers, and stored items. If the faucet uses air-gap drain tubing, allow for that additional below-deck routing as well. For a broader cabinet-layout check, see our RO system installation under-sink guide.
Local plumbing rules can affect drain routing and faucet selection. For example, New York City Plumbing Code Section 611.2 requires reverse-osmosis discharge to enter the drainage system through an air gap or a qualifying air-gap device. That is a jurisdiction-specific requirement, so check with the authority having jurisdiction where you live rather than applying it everywhere. Source: New York City Plumbing Code, Section 611.2.
Can an existing accessory hole be used?
Yes, but only when the existing opening meets every requirement for the exact faucet. Measure the opening instead of relying on the accessory that was previously installed there.
- The hole diameter is within the faucet manual’s permitted range.
- The faucet base fully covers the opening and sits flat on an appropriate surface.
- The total deck thickness is within the stated limit.
- The underside washer and nut can seat flat and remain accessible.
- The spout, handle, and tubing can be positioned as the manufacturer requires.
The Watts GTS550S installation manual discusses use of a 1¼-inch predrilled opening for its supplied faucet. That figure does not establish 1¼ inches as a standard for other RO faucets.
Reject an existing hole if it is incompatible with the manual, the base cannot sit flat, the washer cannot seat, or the total deck thickness exceeds the manufacturer’s limit. Do not improvise reducers, oversized washers, or sealants unless the faucet manufacturer specifically approves them.
RO faucet clearance checks above and below the deck
The exact faucet documentation controls the required dimensions. If a needed dimension is missing, request written installation guidance from the manufacturer before drilling.
| Area | What to check | Reject the location when |
|---|---|---|
| Above the deck | Base footprint, handle travel, spout position, vessel height, and nearby fixtures | The base rocks, controls collide, or the spout cannot discharge into the basin |
| Through the deck | Hole diameter and total thickness of all material layers | The opening or thickness is outside the faucet manual’s limits |
| Below the deck | Washer footprint, nut clearance, tool access, and cabinet components | Hardware cannot seat flat or be reached for installation and future service |
| Tubing route | Product-water tubing and any model-specific air-gap tubing | The route would kink, pinch, contact a hazard, or interfere with moving cabinet parts |
Location decision table
| Candidate | Consider it when | Reject or escalate when |
|---|---|---|
| Existing accessory hole | The manual dimensions fit, the base covers the opening, and mounting hardware is accessible | The hole is incompatible, the deck is too thick, or the washer cannot seat |
| Sink deck | The area is flat and supported, the spout reaches the basin, and the sink maker permits the opening | Ribs, clips, coating, sink material, or structural features create uncertainty |
| Countertop beside the sink | The spout reaches the basin and the countertop manufacturer or fabricator approves the location | The point conflicts with an edge, seam, support, build-up, or inaccessible underside |
| Designated or pre-scored sink position | The sink instructions authorize opening that position and the faucet dimensions fit | The position interferes with normal sink use or cabinet hardware |
When should a sink or countertop professional drill?
Use a qualified sink installer or countertop fabricator when the surface is stone, engineered stone, porcelain, cast iron, glass, or any material whose manufacturer calls for specialized fabrication. Professional review is also sensible near seams, edges, sink cutouts, reinforcement, or concealed supports, and whenever the sink or countertop instructions are unavailable.
MSI’s Q Quartz installation guidance describes wet diamond cutting methods and states that its fabrication guidance is intended for qualified people with technical fabrication skills. That guidance applies to MSI Q Quartz; follow the instructions for your specific surface. Source: MSI Q Quartz installation guidance.
If a fabricator will make the opening, provide the faucet manual, required hole specification, and proposed center point before work begins. For related drain-routing planning, see RO drain saddle placement mistakes to avoid.
Printable pre-drill checklist
Fill in these fields from the product manuals or direct measurements. Do not drill while a required item remains unknown.
- ☐ Faucet manufacturer and model: ____________________
- ☐ RO system manufacturer and model: ____________________
- ☐ Relevant manual page or drawing: ____________________
- ☐ Required hole diameter or permitted range: ____________________
- ☐ Faucet-base diameter or footprint: ____________________
- ☐ Underside washer diameter or footprint: ____________________
- ☐ Maximum permitted deck thickness: ____________________
- ☐ Measured total deck-stack thickness: ____________________
- ☐ Required flat area above and below: ____________________
- ☐ Spout landing point is inside the basin: ☐ Yes ☐ No
- ☐ Tallest usual vessel fits beneath the spout: ☐ Yes ☐ No
- ☐ Main faucet, handles, and sprayer move freely: ☐ Yes ☐ No
- ☐ Backsplash or window clearance confirmed: ☐ Yes ☐ No
- ☐ Washer and mounting nut can sit flat: ☐ Yes ☐ No
- ☐ Installation tool can reach the mounting nut: ☐ Yes ☐ No
- ☐ Sink clips, rails, ribs, and webbing checked: ☐ Yes ☐ No
- ☐ Disposal, wiring, plumbing, and drawers checked: ☐ Yes ☐ No
- ☐ Product-water tubing route planned: ☐ Yes ☐ No
- ☐ Air-gap tubing route checked if applicable: ☐ Yes ☐ Not applicable
- ☐ Sink or countertop drilling instructions reviewed: ☐ Yes ☐ No
- ☐ Local plumbing requirements checked: ☐ Yes ☐ No
- ☐ Fabricator or installer approval obtained if needed: ☐ Yes ☐ Not needed
Frequently asked questions
Can I place an RO faucet in a soap-dispenser hole?
Possibly. Measure the hole, total deck thickness, faucet-base coverage, underside washer clearance, and tool access, then compare each result with the exact faucet manual. An unused accessory hole is not automatically compatible.
How far should an RO faucet be from the main faucet?
There is no supported universal distance. Choose a position where both faucets, handles, and any sprayer operate freely, the RO spout reaches the basin, and the exact faucet’s base and underside hardware fit on a flat, accessible mounting area.
Do I need an air-gap RO faucet?
It depends on the system instructions and local plumbing requirements. An air-gap setup can need additional below-deck tubing space. Check the applicable local rule and the RO manufacturer’s installation instructions before choosing the faucet.
Make the final drilling decision only after the same candidate point passes the above-deck use test, through-deck measurement check, and below-deck access inspection.
- NSF/ANSI standards explained (42/53/401/58)
- Clear trade-offs: pitcher vs faucet vs under-sink vs RO
- Maintenance planning: cost per gallon and replacement cadence