
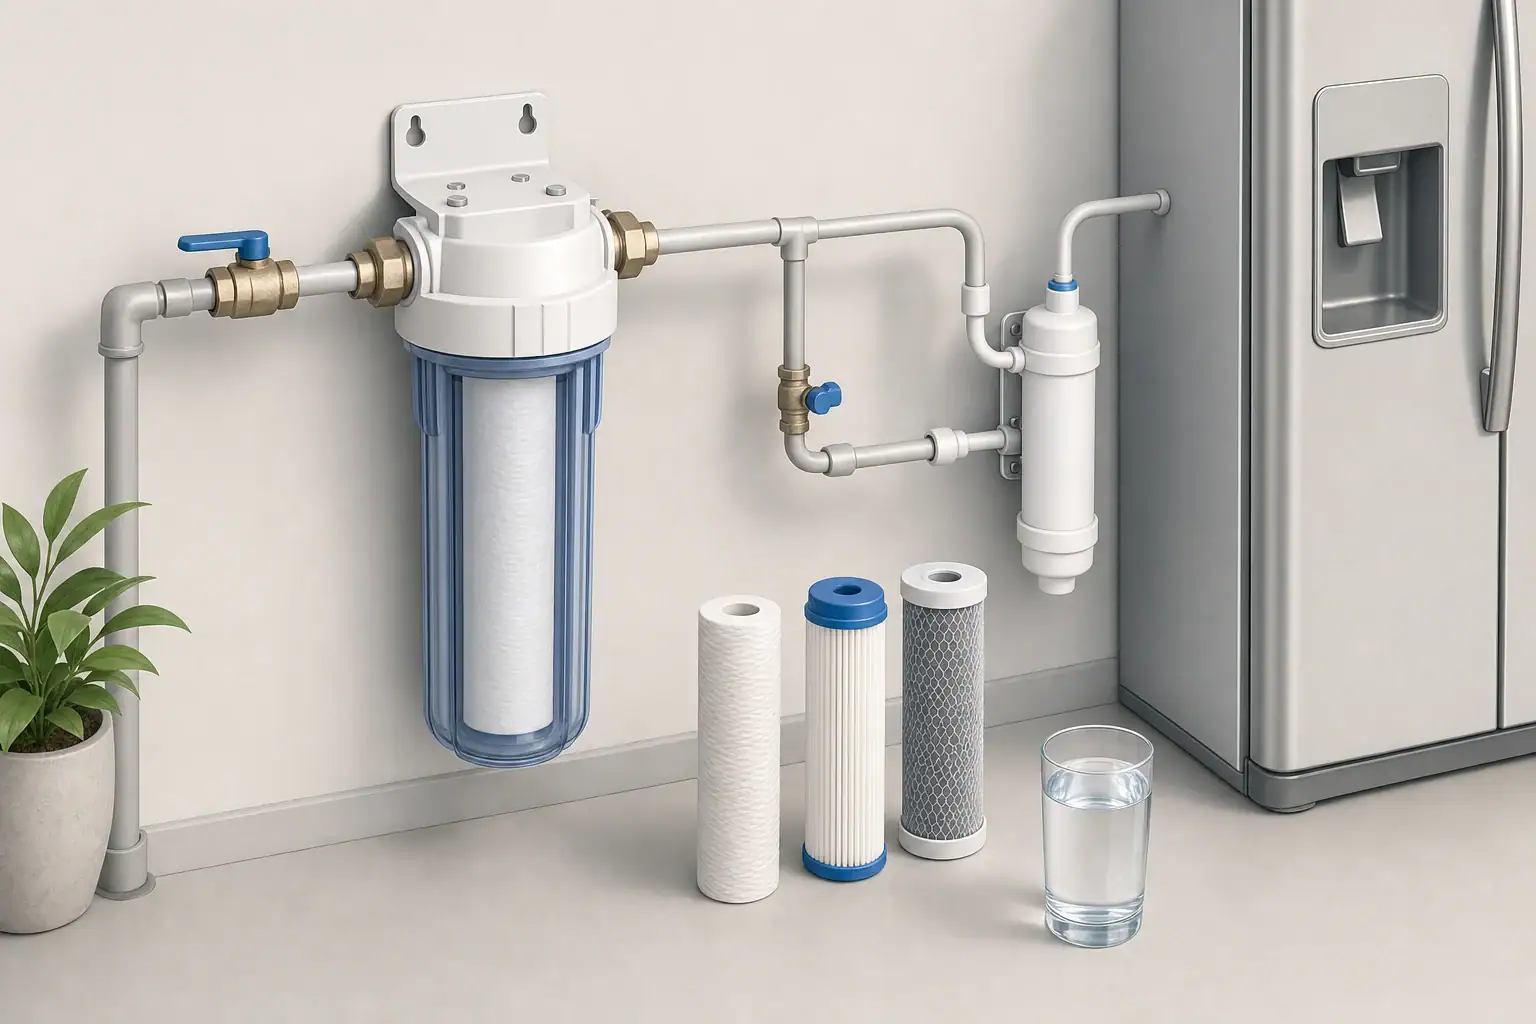
An ice maker inline filter is installed in the small cold-water supply line that serves a refrigerator or standalone ice maker. Placement matters because the filter must be accessible, protected from damage, oriented correctly, and close enough to the appliance to avoid unnecessary tubing.
For many homes, the preferred sequence is the cold-water source, an accessible shutoff valve, the inline filter, and then the refrigerator. The exact location depends on cabinet access, tubing material, available pressure, appliance requirements, and local plumbing rules.
Where an Ice Maker Inline Filter Should Be Placed
Place the filter on the dedicated cold-water line supplying the refrigerator, normally downstream of the line’s shutoff valve. This arrangement lets you close the water supply before replacing the cartridge or inspecting the fittings.
A nearby cabinet, basement ceiling, utility area, or accessible space under the kitchen sink is usually better than the narrow space directly behind the refrigerator. A filter behind the appliance may be difficult to reach, and moving a refrigerator can bend tubing or disturb connections.
Characteristics of a suitable location
- Accessible: The cartridge and fittings can be reached without removing permanent panels or heavy appliances.
- Protected: The filter is not exposed to freezing, excessive heat, cleaning chemicals, impacts, or stored objects.
- Supported: Tubing does not carry the full weight of the filter.
- Visible: Connections can be checked periodically for moisture or slow leaks.
- Compatible with flow direction: The filter’s inlet and outlet can follow the marked direction without sharp tubing bends.
Use an inline filter only on a potable cold-water line unless its documentation expressly allows another application. It should not be connected to a hot-water line. If the supply route passes through a garage, crawlspace, or exterior wall, consider temperature exposure and applicable plumbing requirements.
How to Plan the Supply Route
Trace the refrigerator line back to its source before selecting the filter position. The source may be a dedicated connection under the sink, a basement branch, a utility-room manifold, or another approved cold-water connection.
The route should allow gentle curves rather than tight bends. Kinked tubing can restrict flow, and tension at a fitting may contribute to leaks. Leave enough slack to service the filter and, where appropriate, move the refrigerator without pulling on the supply connection.
Keep the shutoff valve upstream
The dedicated shutoff should normally come before the filter. It must remain reachable so water can be stopped during cartridge replacement or in response to a leak. Do not conceal the shutoff or filter inside a finished wall.
Avoid unnecessary tubing length
A slightly longer route may be worthwhile when it provides better access, but excessive tubing adds friction and more opportunities for damage. Balance a short path with practical service access. Follow appliance and filter instructions for permitted tubing sizes, fittings, mounting position, and maximum line length.
Example values for illustration.
| Location | Access | Main consideration |
|---|---|---|
| Adjacent base cabinet | Good | Protect the filter from stored items |
| Under the kitchen sink | Good | Keep it away from disposal equipment and chemicals |
| Basement below refrigerator | Often good | Secure the filter and account for vertical tubing distance |
| Utility room | Good | A longer route may reduce flow slightly |
| Behind refrigerator | Limited | Avoid crushing, heat, and difficult cartridge changes |
| Inside finished wall | Poor | Do not conceal serviceable filters or connections |
| Unconditioned space | Variable | Avoid freezing and excessive temperature exposure |
Safe Installation Sequence
Read the instructions for the appliance, filter, tubing, and fittings before beginning. Product requirements vary, particularly for tubing type, insertion depth, mounting orientation, pressure range, and cartridge flushing.
1. Identify and close the correct shutoff
Confirm that the valve controls the refrigerator line. Close it before cutting or disconnecting tubing, and relieve pressure by dispensing water if the refrigerator has a dispenser. If the valve does not close completely, is corroded, or is difficult to operate, have it evaluated rather than forcing it.
2. Confirm component compatibility
The filter, connectors, and tubing must have matching dimensions and be intended for potable-water service. Plastic and metal tubing may require different fitting designs or internal supports. Do not improvise adapters or reuse damaged fittings.
A filter should also be selected for the actual treatment goal. Many inline carbon filters are intended primarily to reduce chlorine-related taste and odor. A filter’s documentation should identify its rated uses, capacity, operating pressure, temperature range, and replacement interval.
3. Position the filter in the marked flow direction
Inline housings commonly indicate an inlet and outlet. The inlet faces the water source, while the outlet leads toward the refrigerator. Reversing the filter may impair performance or allow filter media to move in an unintended direction.
Install the filter only in an orientation permitted by its instructions. Some models may be mounted horizontally or vertically, while others specify one position. Use the supplied or compatible mounting support so tubing is not supporting the cartridge.
4. Make clean, unstressed connections
Tubing ends should be square, smooth, and free of cracks. Fully insert or tighten fittings according to their instructions without overtightening. Avoid sharp bends immediately beside a connector.
Plumbing work must comply with local requirements. If the existing connection uses a damaged valve, an uncertain pipe tap, inaccessible plumbing, or unfamiliar fittings, a qualified plumber can establish a serviceable connection without bypassing required safeguards.
5. Restore water and flush the filter
Open the shutoff slowly while watching every connection. Check immediately for moisture, and check again after the line has remained pressurized. Flush the cartridge for the time or volume specified in its instructions. Initial carbon fines or trapped air can cause temporary cloudiness, spurting, or dark particles.
Discard the initial ice produced after installation according to the filter and appliance directions. This clears flushed water and trapped air from the refrigerator’s internal tubing and ice maker.
Placement with Reverse Osmosis and Existing Refrigerator Filters
A refrigerator may already have an internal cartridge, or it may receive water from an under-sink reverse osmosis system. Adding another inline filter is not automatically beneficial. Multiple filters can create extra pressure drop, duplicate treatment, and increase maintenance.
When the refrigerator has an internal filter
Review the appliance instructions before combining filters. Some refrigerators permit an approved bypass component when adequately filtered water is supplied externally. Never modify the appliance or defeat a safety feature. If both filters remain in service, account for the combined flow restriction and replace each on its own schedule.
When water comes from reverse osmosis
RO systems commonly deliver water at lower pressure and flow than a direct cold-water line, especially while the storage tank is depleted. The refrigerator or ice maker must be compatible with that supply. Long tubing runs, elevation changes, and another restrictive filter can make slow filling more noticeable.
An inline carbon polishing filter may be part of an RO system’s intended design, but adding an unplanned cartridge downstream should be based on the system instructions and the desired treatment function. Use tubing and fittings compatible with RO water and the system’s operating conditions.
Flow Rate, Pressure, and Filter Sizing
Ice makers use water intermittently, so they usually need less continuous flow than a kitchen faucet. Even so, inadequate pressure or a heavily restricted filter can lead to small ice cubes, slow production, or poor dispenser flow.
Available pressure at the refrigerator depends on source pressure, tubing diameter and length, elevation, valves, fittings, filters, and simultaneous household demand. A pressure reading taken at another fixture may not represent conditions at the appliance. Understanding water pressure versus flow rate can help identify the cause of slow delivery.
Choose a filter rated for the home’s expected pressure and the appliance’s flow needs. Capacity ratings are not guarantees of a fixed service life. Sediment, water chemistry, usage, and contaminant loading can shorten the practical interval. A sediment prefilter may be more appropriate upstream when visible particles repeatedly plug a carbon cartridge, but treatment should match the actual water condition.
Maintenance, Leak Checks, and Troubleshooting
Record the installation date and planned replacement date where it will be easy to find. Replace the cartridge according to its instructions or sooner if there is a sustained decline in flow, a return of taste or odor, or evidence that the filter has reached its rated capacity.
Inspect the filter and connections periodically. Look for droplets, mineral deposits, cabinet swelling, damp flooring, tubing abrasion, or a cartridge that has shifted in its mount. A leak-detection device or drain pan may provide additional awareness where appropriate, but it does not replace accessible plumbing and regular inspection.
Common performance problems
- No water after installation: Confirm that the shutoff is open, the tubing is not kinked, and any appliance controls are set correctly.
- Low flow: Check for an exhausted cartridge, excessive tubing length, restrictive fittings, low source pressure, or multiple filters in series.
- Air or cloudy water: Flush the cartridge as directed and allow trapped air to clear.
- Particles in initial water: Continue the required flush. Persistent particles may indicate incorrect flow direction, a damaged cartridge, or an unsuitable filter.
- Leak at a fitting: Close the shutoff promptly, relieve pressure, and remake or replace the connection using the correct components.
Example values for illustration.
| Observation | Possible factor | Practical check |
|---|---|---|
| Flow drops gradually | Filter loading | Review cartridge age and rated capacity |
| Flow drops immediately | Kink or closed valve | Inspect the route and shutoff position |
| Dispenser works but ice is slow | Appliance demand or fill issue | Check appliance instructions and supply conditions |
| Flow changes during household use | Variable source pressure | Observe performance at different demand periods |
| RO-fed refrigerator fills slowly | Low delivery pressure | Check tank condition, tubing route, and compatibility |
| New filter causes restriction | Incorrect sizing or installation | Verify flow direction, rating, and tubing connections |
Related guides:
Inline Fridge Filters: When to Use an External Inline Filter •
Refrigerator Filter Compatibility: How to Find the Right Replacement •
Fixing Low Flow from a Refrigerator Dispenser •
Refrigerator Filter Leaks: Common Causes and Quick Fixes
Final Placement and Startup Checks
Before returning the refrigerator or stored items to position, confirm that the filter is secured and visible, the shutoff remains accessible, and the tubing has no kinks or tension. Make sure the appliance cannot roll onto or pinch the supply line.
Labeling the installation date on a nearby maintenance record can simplify future service, but do not cover required markings on the cartridge. Recheck all connections after several hours and again after the ice maker has completed multiple fill cycles.
A well-placed inline filter is not simply the closest point to the refrigerator. It is a location that preserves flow, follows the required direction, protects the cartridge, and allows the water to be shut off and the filter replaced without disturbing hidden plumbing.
Frequently asked questions
Should an ice maker inline filter go before or after the shutoff valve?
Install the filter downstream of the dedicated shutoff valve in most cases. This allows the water supply to be turned off before servicing the filter or its fittings.
Can an inline ice maker filter be installed behind the refrigerator?
It can be installed there if the location remains protected and accessible, but an adjacent cabinet or utility space is often easier to inspect and service. Avoid any position where the refrigerator can pinch the tubing or connections.
Which direction should an inline water filter face?
Follow the flow arrow or inlet and outlet markings on the filter housing. The inlet should face the water source, and the outlet should lead toward the refrigerator or ice maker.
Do I need an inline filter if my refrigerator already has a water filter?
Not necessarily. Using both may add flow restriction and duplicate treatment. Check the refrigerator and filter instructions before combining filters, and account for maintenance of each cartridge.
Why is my ice maker slow after installing an inline filter?
Check for a kinked tube, a partially closed valve, incorrect flow direction, a restrictive filter, or low supply pressure. Flush the filter as directed and confirm that the cartridge is suitable for the appliance’s flow needs.
- NSF/ANSI standards explained (42/53/401/58)
- Clear trade-offs: pitcher vs faucet vs under-sink vs RO
- Maintenance planning: cost per gallon and replacement cadence