
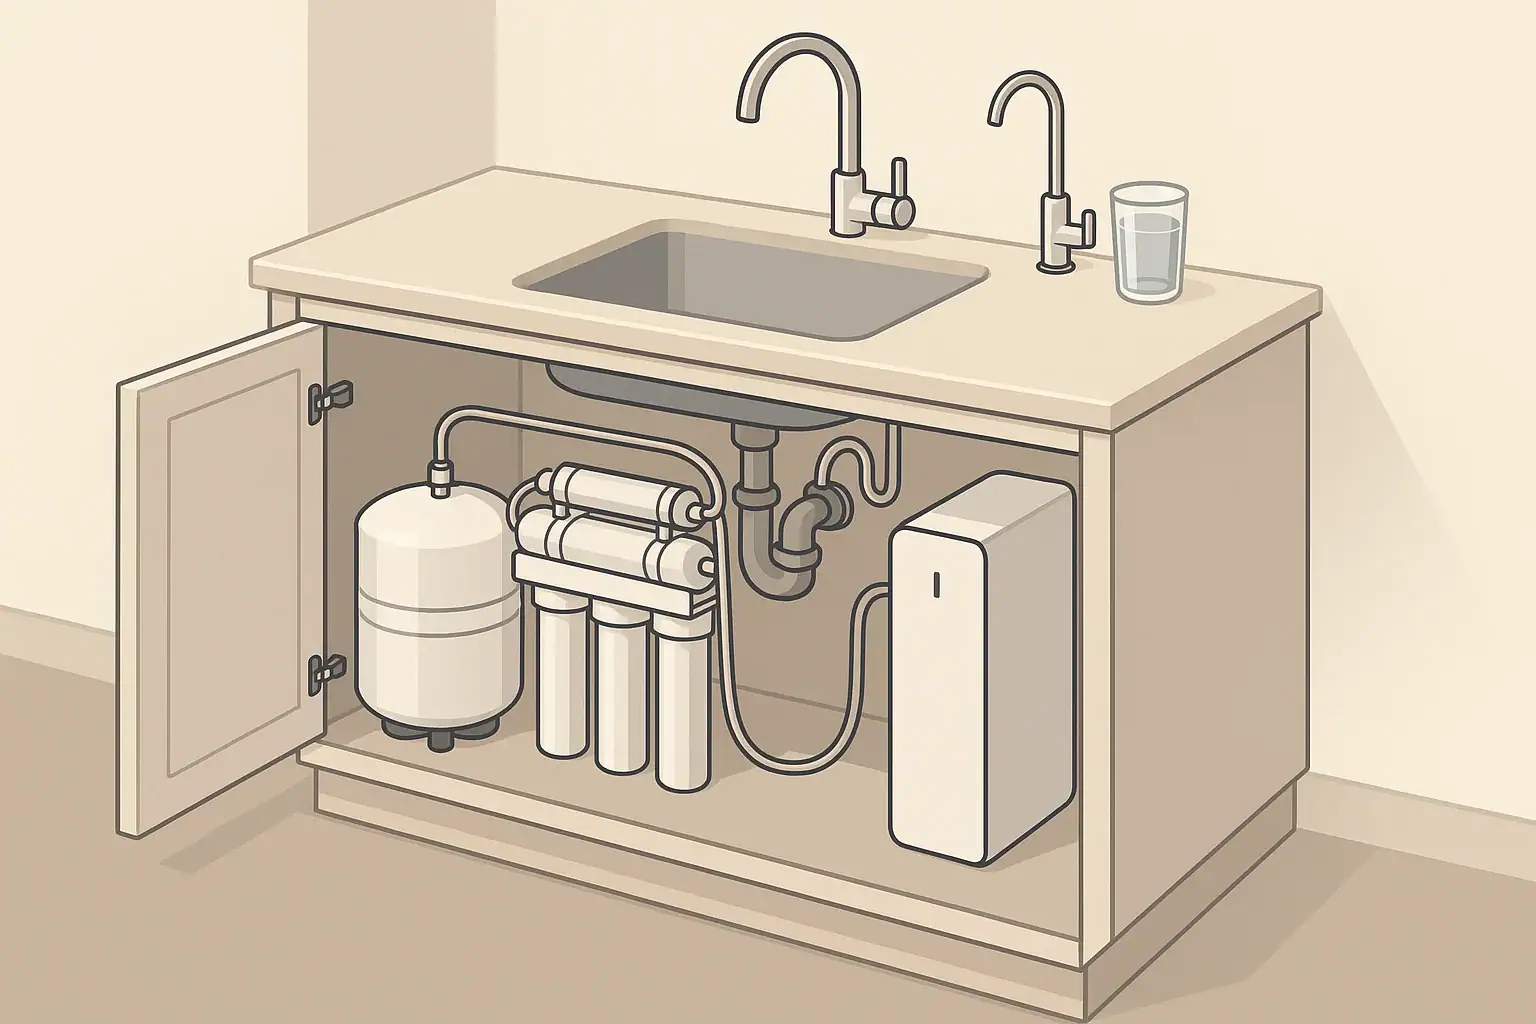
A small cabinet can still support a useful under-sink water filter, but the layout matters as much as the filter type. Many returns, awkward installations, and hard-to-service systems happen because the cabinet was estimated by eye instead of measured.
Under-sink filters range from a single carbon cartridge to multi-stage reverse osmosis systems with separate tanks, drain connections, and dedicated faucets. Each design has different space needs. Before comparing performance features, cartridge life, or flow rate, it is worth mapping the cabinet like a small utility space.
This article focuses on practical measuring and layout decisions for compact cabinets under kitchen sinks. It does not cover brand-specific dimensions or plumbing shortcuts. Always follow the installation manual for the product you choose, and use a qualified plumber when the connection, drain, electrical outlet, or faucet opening is uncertain.
Why Small Cabinet Layouts Need Planning
Under-sink space is rarely a clean rectangle. The sink basin, garbage disposer, drain trap, water shutoff valves, supply lines, dishwasher hose, sprayer hose, and stored items all compete for the same area. A filter housing may fit on paper but still be difficult to mount, change, or inspect.
Small cabinets usually create three layout challenges:
- Limited clear height: Deep sinks and large disposers reduce the vertical space available for cartridges and reverse osmosis tanks.
- Limited door access: The opening may be narrower than the inside cabinet, making it hard to insert a tank or swing a filter wrench.
- Maintenance clearance: Cartridges, sumps, and tubing need room for replacement, not just installation.
Different Filters Use Space Differently
A compact carbon filter may use one vertical housing mounted to a side wall. A two- or three-stage filter may need a wider bracket. A reverse osmosis system may add a storage tank, drain saddle or approved drain connection, dedicated faucet line, and sometimes a power requirement if it uses a pump or electronic controls.
Tankless reverse osmosis systems can reduce floor space, but they are often taller or wider in one direction and may require an outlet. Traditional RO systems with a storage tank can be flexible because the tank may sit on the cabinet floor, but the tank still needs a stable location that does not kink tubing or block access to shutoff valves.
Usable Space Is Not the Same as Empty Space
The empty area you see when you open the cabinet is not automatically usable. A filter should not interfere with the handle movement of shutoff valves, the drain trap, or the ability to inspect for leaks. Tubing should have gentle curves rather than sharp bends. If the system includes a storage tank, it should rest securely and remain accessible enough to check connections.
How to Measure Before You Compare Filters
Use a tape measure, a flashlight, and a simple sketch. You do not need a professional drawing, but you do need measurements that reflect the real cabinet, not the nominal cabinet size. A sink base sold as a certain width may have less usable interior width after side panels, face frames, hinges, and plumbing are considered.
Measure Width Depth and Height
Start with the inside width from the left interior wall to the right interior wall. Then measure the usable depth from the back wall to the inside of the closed door or face frame. Finally, measure the clear height from the cabinet floor to the lowest obstruction, such as the bottom of the sink basin, disposer, or drain pipe.
Take these measurements in more than one location. The right side of the cabinet may have more height than the center if the sink basin is offset. The back corner may be blocked by supply lines, while the front corner may be clear but less suitable for tubing.
Measure the Door Opening
The cabinet opening can be the limiting factor. A tank or large filter body may fit inside once placed, but it still has to pass through the door opening. Measure the clear width and height of the opening with the door fully open. Also note whether a center stile divides double doors.
Mark Existing Plumbing and Moving Parts
On your sketch, mark the hot and cold shutoff valves, drain trap, disposer, dishwasher drain hose, sprayer hose, pull-down faucet weight, and any electrical outlet. If the faucet has a pull-down sprayer, move it through its normal range and notice where the hose and weight travel. A filter that blocks this path can make the faucet feel stuck or unreliable.
Example values for illustration.
| Area to measure | What to record | Why it matters |
|---|---|---|
| Interior width | Side wall to side wall | Shows whether a multi-stage bracket can fit |
| Usable depth | Back wall to door clearance | Prevents housings or tanks from hitting the door |
| Clear height | Floor to lowest obstruction | Helps compare cartridge and tank dimensions |
| Door opening | Actual access width and height | Confirms larger components can be inserted |
| Valve access | Space around shutoff handles | Keeps emergency shutoff reachable |
| Drain area | Trap and disposer location | Identifies conflicts with RO drain routing |
| Service clearance | Space below and in front of filter | Allows cartridge changes and leak checks |
Choosing a Layout for Limited Cabinet Space
Once the cabinet is measured, compare filter layouts rather than only filter categories. Two systems that both reduce taste and odor may have very different footprints. Likewise, two reverse osmosis systems may differ in tank size, bracket shape, tubing exits, and faucet requirements.
Single Cartridge Carbon or Sediment Layouts
A single under-sink carbon or sediment housing is often the simplest compact layout. It may mount vertically on a side wall or back wall and connect to the cold water line. It can be a good fit when the main goal is taste, odor, or basic particulate reduction, depending on the cartridge and its verified claims.
The key measurement is service clearance below the housing. Many cartridge-style systems need the lower housing or cartridge to drop down during replacement. If a trash can, disposer, or cabinet floor lip blocks that movement, maintenance becomes frustrating.
Two- and Three-Stage Non-RO Layouts
Multi-stage systems commonly place cartridges side by side on a bracket. These can provide sediment and carbon stages, and some include specialty media for specific concerns. They usually need more width than a single housing but may avoid the tank and drain connection associated with reverse osmosis.
For small cabinets, check whether the bracket must be mounted perfectly vertical and whether cartridges are removed downward, forward, or by twist-lock motion. A system that looks compact may still need hand clearance around each cartridge.
Reverse Osmosis With a Storage Tank
A traditional under-sink RO layout usually includes prefilters, an RO membrane stage, postfilter, storage tank, drain connection, and dedicated drinking water faucet. The storage tank is often the largest loose component. It may sit upright on the cabinet floor or, if the product instructions allow, in another approved orientation.
In a small cabinet, the tank and filter bracket should be arranged so that tubing is visible and not pinched. Avoid placing heavy cleaning products against tubing or fittings. Also keep the cold water shutoff accessible. If the shutoff is hidden behind a tank, a small leak or service need becomes harder to manage.
Tankless Reverse Osmosis Layouts
Tankless RO systems can be attractive where floor space is tight. Instead of storing filtered water in a tank, they produce water on demand and commonly use a more compact cartridge module. However, they may have specific pressure and electrical requirements, and faucet flow can vary by design and water conditions.
Measure the module like an appliance rather than a simple cartridge. Confirm the required orientation, clearance for cartridge removal, tubing exits, and access to any reset or indicator features. If an outlet is required, it should be a safe, code-compliant outlet suitable for the location. Do not run unsafe extension cords through a sink cabinet.
Clearance for Maintenance Leaks and Daily Storage
A good small cabinet layout leaves space for ownership, not just installation. Filters need periodic cartridge changes, and RO systems also need attention to membrane replacement, tank pressure checks where applicable, sanitation procedures, and leak inspection based on the manufacturer’s instructions.
Plan for Cartridge Replacement
Before buying, look at how the filters are changed. Some housings require a wrench and downward clearance. Some cartridges twist out with a quarter turn. Others pull forward. In a tight cabinet, the easiest design is usually the one you can reach without removing the trash can, unloading the entire cabinet, or straining around the disposer.
Leave room for a towel, shallow pan, or other routine service items recommended by the manufacturer. A few drops during filter replacement can be normal for some designs, but standing water or repeated dripping should be addressed promptly.
Keep Leak Checks Simple
Small cabinets often become storage spaces for cleaners, bags, and tools. After adding a filter, avoid packing items tightly around fittings. You should be able to see the inlet connection, outlet connection, drain tubing if present, and tank connection if present.
Leak awareness is practical, not alarmist. Any under-sink water device adds connections. Good visibility, careful installation, and periodic checks reduce the chance that a small drip goes unnoticed.
Protect Tubing and Hoses
Plastic tubing should follow smooth bends. If it is sharply folded behind a tank or pinched by a trash can, flow can drop and fittings can be stressed. Also check the pull-down faucet hose. Its weight should not strike the filter bracket or catch on tubing during daily use.
Plumbing Faucet Drain and Power Checkpoints
Space planning is also utility planning. An under-sink filter may need a cold water connection, a separate drinking water faucet, a drain connection for RO reject water, or an electrical outlet. These are not details to solve after the box is open.
Cold Water Connection
Most kitchen under-sink filters connect to the cold water line. The existing shutoff valve should be in good condition and reachable after installation. If a valve is corroded, stuck, leaking, or unusual, have it evaluated before adding equipment. Do not bypass shutoff valves or install parts that prevent the water from being turned off for service.
Dedicated Faucet Placement
Many under-sink filters, especially RO systems, use a dedicated drinking water faucet. Some sinks or countertops have an unused accessory hole. Others require drilling, which may not be appropriate for all materials or rental situations. Stone, porcelain, stainless steel, and composite surfaces have different risks and tool requirements. When in doubt, use a qualified installer.
RO Drain and Air Gap Considerations
Reverse osmosis systems send a portion of feed water to drain as part of the separation process. The drain connection must follow the product instructions and local plumbing expectations. Some faucets include an air gap design, and some systems have specific drain routing requirements. Do not cap, bypass, or modify safety features to save space.
Electrical Outlet Needs
Some tankless RO systems, booster pumps, monitors, or leak-control accessories require power. If electricity is needed under a sink, the outlet should be appropriate for the wet location and installed according to applicable electrical code. Avoid placing plugs where stored items can loosen them or where a leak would be difficult to detect.
Example values for illustration.
| Check | Possible cabinet issue | Planning note |
|---|---|---|
| Inlet pressure | Low pressure can slow RO production | Compare home conditions with the product requirements |
| Pressure fluctuation | Flow may vary during peak water use | Consider measuring at different times if performance is uncertain |
| Storage tank location | Tank may block valves or tubing | Keep shutoff access and smooth tubing bends |
| Tankless power need | Outlet may be absent or poorly located | Use only safe code-compliant power arrangements |
| Drain routing | Trap or disposer may crowd the drain area | Follow the manufacturer’s approved drain instructions |
| Filter change access | Cartridges may need front or bottom clearance | Confirm removal direction before choosing a mounting spot |
Related guides: Under-Sink Filter Installation: Tools, Parts, and Common Mistakes • Under-Sink Filters for Apartments: Space-Saving Mounting Ideas • RO System Installation Guide: Space-Saving Layout Under the Sink • Fixing Under-Sink Filter Leaks: 7 Quick Checks
Final Pre-Purchase Checklist
Before you buy an under-sink filter for a small cabinet, review your measurements and match them to the actual components. Focus on the complete installed layout, not just the main filter body.
- Measure interior width, depth, clear height, and door opening.
- Sketch the sink basin, disposer, drain trap, shutoff valves, hoses, and outlet if present.
- Confirm how cartridges are removed and how much service clearance is needed.
- Check whether the system requires a dedicated faucet hole.
- For RO systems, plan space for the tank or tankless module, drain routing, and pressure requirements.
- Keep shutoff valves visible and reachable after installation.
- Leave room to inspect fittings and tubing after the system is in use.
- Avoid unsafe plumbing, drain, or electrical work intended only to make a system fit.
A compact cabinet does not rule out under-sink filtration. It simply rewards careful measuring. When the layout is planned before purchase, the system is more likely to fit cleanly, remain serviceable, and work with the way the kitchen is used every day.
Frequently asked questions
How much space do I need under a small sink for a filter?
It depends on the filter type. A single cartridge system may fit in a narrow area, while reverse osmosis systems usually need extra room for a tank, drain line, and service access.
Can I install an RO system in a cabinet with a garbage disposer?
Yes, sometimes, but the disposer can reduce clear height and limit tank placement. Measure carefully and make sure the drain routing and shutoff valves remain accessible.
What should I measure before buying?
Measure interior width, depth, clear height, and the door opening. Also mark valves, drain parts, hoses, and any outlet so you know what space is truly available.
Is a tankless filter better for a small cabinet?
It can be, because it often uses less floor space than a tank-based RO system. Still, check its height, mounting needs, power requirements, and cartridge clearance before choosing it.
Why does maintenance clearance matter so much?
Filters are not just installed once; they need cartridge changes and leak checks. If you cannot reach the fittings or remove parts easily, routine service becomes difficult.
Recommended next:
- Under-Sink vs Pitcher: Which Is Better for Families?
- Best Under-Sink Filters for Chlorine Taste & Odor
- Under-Sink Filter Installation: Tools, Parts, and Common Mistakes
- No-Drill Under-Sink Filters for Renters: What’s Possible?
- Under-Sink Filters for Lead Reduction: What Certifications to Look For
- Under-Sink Filter Flow Rate Explained: Why GPM Matters
- More in Under-Sink Filters →
- NSF/ANSI standards explained (42/53/401/58)
- Clear trade-offs: pitcher vs faucet vs under-sink vs RO
- Maintenance planning: cost per gallon and replacement cadence